Alfa Cylinder Head Gaskets
 An Alfa's head gasket has a tough job. It keeps oil, coolant, and the combustion chambers separate under a broad range of conditions. It has a relatively small contact area, consisting of several pieces of different materials, and is held in place by relatively long, flexible head studs. The surprise is that it works at all!
A head gasket can fail in any one of several ways. External loss of fluid, while messy and annoying, is rarely so bad as to threaten major engine damage so long as the fluid in question is kept topped up. Contamination of either coolant or oil, however, will compromise engine cooling or lubrication and will result in catastrophic engine failure. Oil in the coolant usually shows up as an oily film, gradually blending into cloudy goo that degenerates into thick brown sludge. Coolant in the oil can show up on the dipstick or in the bottom of the sump when you first pull the drain plug. When heated and blended with oil it will appear as chocolate milk-shake gunk in the valve cover and crankcase breather, or on the bottom of the oil cap.
Coolant leaking into the cylinders leads to serious engine damage. Simple loss of coolant can lead to overheating, with subsequent warpage of engine parts. While the engine is running, coolant leaking into a cylinder effectively raises the compression ratio, leading to detonation and explosive superheating of the coolant. Potentially disastrous consequences are broken rings or pistons, bent connecting rods, eroded head, dropped valves, blown motor, etc. Trying to start an engine after one cylinder has partially filled with coolant can cause the same kind of damage.
The procedure for head gasket replacement is included in the shop manuals we sell, but a few particulars need special attention. It is essential to check the head sealing surface for flatness. If you don’t have access to a machinist’s straight edge, have a machine shop check it. Nothing else is accurate enough. Clean off all the old gasket material and check for warp, bow, and twist. If you can see light under the straight-edge or slip anything thicker than a 0.002-in. feeler blade under it, the head should be machined.
There is sufficient material in the head to allow refinishing every time the head is removed during the life of the car. As much as 0.040” may be taken off before the compression ratio goes so high as to require high-octane fuel. Be aware that clearance between oversized valves and high compression pistons may become a problem around 0.020” of material removed. However, we cannot accept heads machined more than 0.010" as cores in exchange for our remanufactured heads. See the following chart for the new, uncut cylinder head height.
| Engine | Standard Head Height (inches) |
|---|---|
| 750 Series 1300 Normale | 4.055 inches |
| 750 Series 1300 Veloce | 3.995 inches |
| 101/105 Series 1300 Normale | 4.410 inches |
| 101 Series 1300 Veloce | 4.350 inches |
| 1600, 1750, 2000 (All, including GTA) | 4.410 inches |
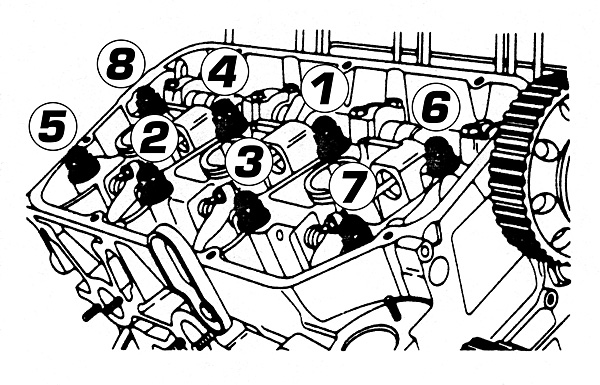
We recommend installing all Alfa head gaskets clean and dry, without sealing compounds of any kind, except at the back of 4-cylinder head gasket as indicated by a sticker on the packaging. Follow the factory torquing pattern using the higher range of specified torques. After everything is reassembled and timed, turn the engine over gently by hand to check for clearance or valve timing problems. See the illustrations below for cylinder head torque sequence; and refer to our torque specification chart or a proper service manual for the correct torque values.

4-Cylinder Torque Sequence
6-Cylinder Torque Sequence
Next, tension the cam chain. Although there are several techniques in print for adjusting the cam chain tensioner, only one is safe. With the engine off, loosen the tensioner lock bolt. BY HAND, roll the engine forward by turning the crank. This will take any slack out of the "long" side of the upper chain, allowing the tensioner spring to push out the sprocket. You can assist the spring in taking up slack by levering gently against the tensioner assembly with a pry bar, but final chain tension should be set by the spring alone. Overtightening will cause excessive wear and noise. Prior to the first road test, bring the vehicle up to operating temperature, shut off, and retorque each head nut up to factory torque values. Then, after your first drive, at 500 miles, and at 1000 miles, retorque cold to the specified torque. Following the factory pattern, slightly loosen one nut at a time and tighten it back to torque in one smooth pull. Proceed through the sequence one nut at a time. When finished, you may choose to go through the sequence a final time, double-checking that each nut is up to spec. From that point, retorquing at each valve adjustment should be adequate.
You’ll be amazed at the degree to which things move around as they get settled. You may also be surprised at how well the head gasket will seal if given the chance.
Temperature Gauges
We occasionally get the call, "My temperature gauge indicated overheating, then it returned to the normal range, so I thought everything was OK. Next thing I knew, my head gasket was but a memory! What happened?" What happened is that the car ran out of water. When there is no water from which to take a temperature reading, the gauge "returns to normal." When your car indicates it is overheating-STOP! There is a problem; it may be trivial, but it will become major! Overheating will blow the head gasket and may warp the head. Piston rings that get too hot can loose their tension against the cylinder walls resulting in lost compression and greatly increased oil burning.